Microsoft Defender for Identity
Active Directory (AD) is still at the heart of most businesses today. Although being very critical, it also offers a large attack surface for any potential attacker. This is why a lot of cyber attacks have shifted to identity based attacks, as they offer the most bang for the buck. These attacks may lead to a security breach and cause significant damage to an organization.
Recently many security solutions have become available that can protect AD from these advanced threats. One such solution comes from Microsoft and is called Defender for Identity (MDI). MDI uses on-premises agents installed on your domain controllers in order to send logs and analytics about critical activity occurring in AD. This data is sent to the Microsoft cloud, which in turn uses known threat patterns and machine learning to detect anomalous behavior. Some of these advanced threats that MDI can detect are:
- Account enumeration reconnaissance
- Pass-the-hash attack
- Suspicious VPN connection
- Remote code execution attempt
- …
You can find the full list of detections on the official website here: Microsoft Defender for Identity security alert guide | Microsoft Docs
Despite the fact that this solution provides excellent visibility into advanced AD threats, it currently only generates alerts and notifications when such threats occur. So whenever a threat was detected, a potential SOC team had to manually contain these threats, for instance by disabling or resetting passwords of the affected accounts to prevent lateral movement.
However this limitation has recently changed as MDI now offers the possibility to disable users and reset their passwords on an AD account. These actions can be performed from the Microsoft 365 Defender portal either manually or automatically using custom detection rules, which we will explore further below.
How to setup the action account
Before any action can be performed, an action account must be created in AD and it must be given the appropriate permissions respecting the principle of least privilege. This action account can and should be a group managed service account. Microsoft Docs offers a good guide on how to prepare this action account here: Manage action accounts | Microsoft Docs
However, in order to streamline this configuration, it can be improved by using a little PowerShell magic and assigning the permissions using code:
$NETBIOSDomainName = "YourNetBiosDomainName"
$serviceAccountName = "gmsa_MDIActions"
$OU = "CN=Here,CN=Goes,dc=OU,dc=Your"
$cmdstr = '& dsacls --% "{0}" /G {1}\{2}:WP;pwdLastSet;user' -f $OU, $NETBIOSDomainName, $serviceAccountName
Invoke-Expression -Command $cmdstr
$cmdstr = '& dsacls --% "{0}" /G {1}\{2}:WP;userAccountControl;user' -f $OU, $NETBIOSDomainName, $serviceAccountName
Invoke-Expression -Command $cmdstr
$cmdstr = '& dsacls --% "{0}" /G {1}\{2}:CA;Reset Password;user' -f $OU, $NETBIOSDomainName, $serviceAccountName
Invoke-Expression -Command $cmdstr
$cmdstr = '& dsacls --% "{0}" /G {1}\{2}:WP;members;group' -f $OU, $NETBIOSDomainName, $serviceAccountName
Invoke-Expression -Command $cmdstr
Just make sure to replace the appropriate variables in the first three lines with what suits your environment and to give this service account “logon as service” permissions on all the DC’s using the “Domain Controller GPO”.
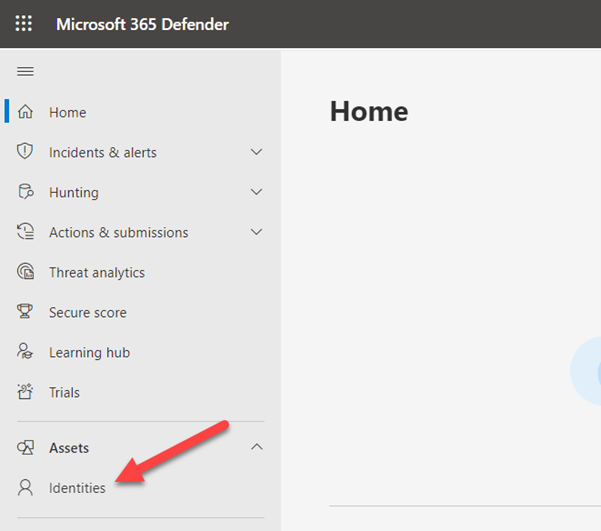
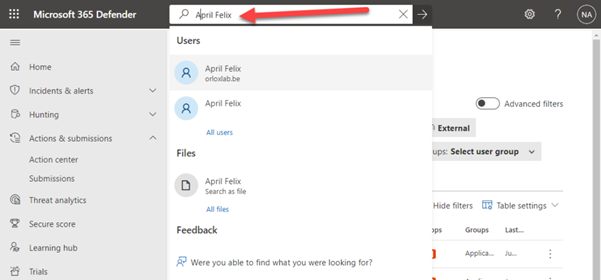
Finally, in order to validate the configuration, you can go to the Microsoft 365 Defender portal and try to manually disable a user using the new identities page or look for the user directly using the search bar at the top of the portal’s page.


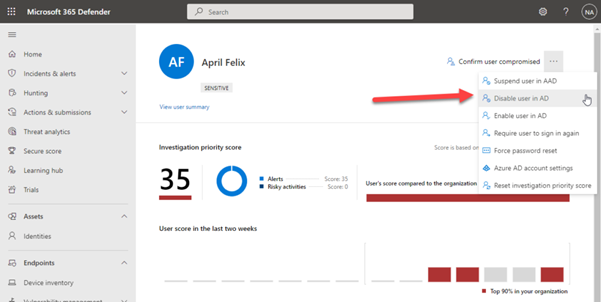
Once on the User page, at the top right, you can choose to disable this user in AD.
To confirm that this was successful, you can go to Actions & Submissions -> Actions center -> History to view the status of the action you just ran.
Now that the actions account has been properly setup and validated, we can move on to automatically disabling users if needed.


Custom detection rule
Custom detection rules are rules you can design and tweak using advanced hunting queries. These rules let you proactively monitor various events and system states, including suspected breach activity and misconfigured endpoints. You can set them to run at regular intervals, generating alerts and taking response actions whenever these detection rules are triggered.
By going to the Hunting -> Advanced hunting section, we will create a KQL query that will return all security alerts that were produced by MDI and extract the users that were identified as the “source” of these alerts and disable them in Active Directory.
First, we start by defining the following KQL query:
AlertEvidence
| where Timestamp > ago(1h)
| where  ServiceSource == "Microsoft Defender for Identity"
| where EntityType  == "User"
| where EvidenceDirection == "Source"
Then choose Create detection rule, which will take you through the custom detection rule creation wizard.


The most notable fields of the initial page are the Frequency (recommended: Every hour) and the Severity (recommended: High). Next, choose the Impacted entities, in this case User, and the column that will be used to identify the user ID, which will be AccountSid.
Finally, we will be able to choose the action that needs to be taken when our rule gets triggered. In this case, we are going to disable the user(s) in AD so the Disable user action is selected.
And that’s it. If we now turn our attention back to the Alerts section and do something suspicious, like say run a remote PowerShell command on a Domain Controller, we will see the initial MDI alert appear on the Alerts page followed by our custom detection rule Alert which will disable all users in AD that were identified in the initial MDI alert.
I’m sure this new feature of MDI allowing you to disable users in AD and being able to automate it in the Microsoft Defender 365 portal will be of great use to any SOC or IT team seeking to quickly detect and contain advanced Active Directory threats.


TL;DR
We’ve shown how the new action accounts feature of Microsoft Defender for Identity can be effectively utilized to combat advanced on-premises Active Directory threats using Microsoft 365 Defender custom detection rules. We hope this demonstration helps you and your organization enhance your security posture and gain better control over potential security threats within your Active Directory environment.
Thank you for reading! To learn more about how Microsoft Defender for Identity can further protect your systems, or to get assistance implementing these measures, get in touch with us at Orlox. Let us help you secure your operations and safeguard your digital assets.


